

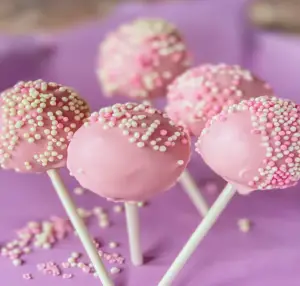
There’s something undeniably delightful about a pink cake pop. Picture this: little orbs of joy, coated in a glossy pink glaze, just waiting to dance their way into your mouth. They’re like tiny party favors that bring an instant smile, whether you’re celebrating a birthday, hosting a baby shower, or simply indulging in a sweet treat on a Tuesday afternoon. The moment you bite into one, it’s like a burst of happiness wrapped in nostalgia and sugar, reminding you of childhood parties where frosting was the main food group.
Once you make these DIY pink cake pops, you’ll find they’re perfect for any occasion—whether it’s a festive gathering or just because you needed some sugar therapy. I remember the time I attempted to impress my friends with these beauties and ended up covered in frosting from head to toe. Spoiler alert: my kitchen looked like a candy explosion! But oh, the joy on my friends’ faces when they took that first bite made every sticky situation worth it. So let’s roll up our sleeves and dive into making these delightful treats!
Why You'll Love This Recipe
- These DIY pink cake pops are not only easy to prepare but also incredibly fun to make with family or friends.
- Their sweet flavor profile will have everyone asking for seconds while their vibrant color makes them stand out at any event.
- Plus, they’re versatile enough to customize with different flavors or decorations based on your preferences!
Ingredients for DIY Pink Cake Pops
Here’s what you’ll need to make this delicious dish:
- Cake (any flavor): Bake your favorite cake or use store-bought; just make sure it’s cooled completely before crumbling.
- Frosting: Choose cream cheese or buttercream frosting for added richness; about 1 cup should do the trick.
- Pink Candy Melts: These are essential for that smooth coating; feel free to go wild with other colors if you’re feeling adventurous!
- Lollipop Sticks: Use sturdy sticks that can hold the weight of your cake pop without bending.
- Sprinkles: Optional but highly recommended! They add extra flair and fun to your finished pops.
How to Make DIY Pink Cake Pops
Follow these simple steps to prepare this delicious dish:
Step 1: Prepare Your Cake Base
Start by baking your cake according to package instructions or your favorite recipe. Once it’s done, let it cool completely before crumbling it into fine pieces in a large bowl.
Step 2: Mix It Up
Add frosting bit by bit into the crumbled cake until the mixture holds together but isn’t overly sticky. You should be able to roll it into balls without too much mess (though let’s be real—there’s probably going to be some mess).
Step 3: Roll Those Balls
Using your hands, form small balls about one inch in diameter from the mixture. Place them on a baking sheet lined with parchment paper and chill them in the fridge for about an hour. This will help them firm up and make dipping easier later.
Step 4: Melt Your Pink Candy Coating
In a microwave-safe bowl, melt your pink candy melts according to package directions—usually around 30 seconds at a time until fully melted. Stir until smooth and creamy.
Step 5: Dip and Decorate
Take each chilled cake ball and dip one end of a lollipop stick into the melted candy coating before inserting it halfway into the cake ball. Then dip the entire pop into the melted candy coating until fully covered. Allow excess coating to drip off before adding sprinkles if desired.
Step 6: Let Them Set
Place your decorated cake pops back onto parchment paper and let them sit at room temperature until set or refrigerate briefly if you’re in a hurry (but who can blame you if you’re not?).
Transfer to plates and enjoy these delightful treats that are bound to bring joy!
You Must Know
- These DIY Pink Cake Pops are not just adorable; they are a fun treat for any occasion.
- With a few simple ingredients, you can create these bite-sized delights that will impress your guests and satisfy your sweet tooth.
- Perfect for parties, kids’ birthdays, or just because you want something pink and cute!
Perfecting the Cooking Process
Start by baking your favorite cake and letting it cool completely. Crumble the cake into fine crumbs, then mix in frosting until you achieve a dough-like consistency. Roll the mixture into balls, chill them, dip in melted chocolate, and voilà—your cake pops are ready to dazzle!
Add Your Touch
Feel free to switch up the flavors! Use different cake types like chocolate or carrot. Experiment with various frostings such as cream cheese or vanilla buttercream. You can also add sprinkles, nuts, or coconut flakes for an extra pop of flavor and texture.
Storing & Reheating
Store your DIY Pink Cake Pops in an airtight container at room temperature for up to three days. If you need to keep them longer, refrigerate for about a week. Reheat is unnecessary; simply enjoy them cold or at room temperature!
Chef's Helpful Tips
- Always let your cake cool completely before crumbling it; warm cake makes mixing tricky.
- Use a cookie scoop for uniform balls; this ensures even baking and consistent sizes.
- Dip your sticks in chocolate before inserting them into the pops to help prevent falling out.
Nothing beats the joy on children’s faces when they see these pink wonders! I remember making these for my niece’s birthday party—her friends devoured them faster than I could say “cake pop.” It was pure bliss!
FAQs:
What are DIY Pink Cake Pops?
DIY Pink Cake Pops are delightful treats made by crumbling baked cake and mixing it with frosting, then rolling the mixture into balls and coating them in pink chocolate or candy melts. These fun desserts are perfect for parties, celebrations, or just a sweet treat at home. heavenly chocolate tarts You can customize them with different flavors, decorations, and toppings to suit your preferences. They are easy to make and always a hit among both kids and adults.
How do I store DIY Pink Cake Pops?
To store your DIY Pink Cake Pops, place them in an airtight container at room temperature for up to three days. If you want to keep them fresh for longer, you can refrigerate them for up to a week. For even longer storage, consider freezing the cake pops. Wrap each one individually in plastic wrap and place them in a freezer-safe container or bag. When ready to enjoy, simply thaw them in the fridge overnight before serving.
Can I use any cake flavor for DIY Pink Cake Pops?
Absolutely! You can use any cake flavor you like when making DIY Pink Cake Pops. Vanilla, chocolate, strawberry, and red velvet are popular choices that pair well with pink coatings. The key is to choose a moist cake that crumbles easily when mixed with frosting. Feel free to experiment with different flavors and fillings to create unique combinations that will delight your taste buds and impress your guests.
How can I decorate my DIY Pink Cake Pops?
Decorating DIY Pink Cake Pops is part of the fun! After coating your pops in pink chocolate or candy melts, consider adding sprinkles, edible glitter, or drizzles of white chocolate for added flair. You can also use colored sugars or crushed nuts to create texture. For themed events, try using themed decorations like fondant shapes or colorful icing designs. Let your creativity shine while decorating these delicious bites!
Conclusion for DIY Pink Cake Pops:
In conclusion, DIY Pink Cake Pops are a versatile and fun dessert option that everyone will love. With simple ingredients and easy instructions, you can create these delightful treats for any occasion. Remember to choose your favorite cake flavor and get creative with decorations to make them uniquely yours. Nutella pizza dessert Whether for a birthday party or a sweet snack at home, these pops are sure to bring joy and satisfaction to every bite! Enjoy making and sharing your delicious creations!
DIY Pink Cake Pops

Indulge in the irresistible charm of DIY Pink Cake Pops! These bite-sized delights are perfect for any celebration, combining crumbled cake and creamy frosting, all coated in a vibrant pink candy melt. Whether it’s a birthday party or just a sweet treat, these fun and colorful cake pops will bring smiles to kids and adults alike. Easy to customize with different flavors and decorations, they’re sure to be a hit at your next gathering!
- Prep Time: 20 minutes
- Cook Time: 0 minutes
- Total Time: 20 minutes
- Yield: Approximately 10 servings 1x
- Category: Dessert
- Method: Baking
- Cuisine: American
Ingredients
- 1 ½ cups crumbled cake (any flavor)
- 1 cup frosting (cream cheese or buttercream)
- 1 cup pink candy melts
- 10 lollipop sticks
- Sprinkles (optional)
Instructions
- Bake your favorite cake according to the package instructions; let it cool completely before crumbling into fine pieces in a large bowl.
- Gradually mix in frosting until the mixture holds together without being overly sticky. Roll into 1-inch balls.
- Chill the cake balls on a parchment-lined baking sheet for about 1 hour.
- Melt pink candy melts in a microwave-safe bowl, stirring until smooth.
- Dip one end of each lollipop stick into the melted candy, then insert it halfway into each chilled ball. Dip the entire ball into the melted candy coating until fully covered, allowing excess to drip off. Add sprinkles if desired.
- Place back on parchment paper and let set at room temperature.
Nutrition
- Serving Size: 1 cake pop (45g)
- Calories: 150
- Sugar: 12g
- Sodium: 40mg
- Fat: 7g
- Saturated Fat: 4g
- Unsaturated Fat: 2g
- Trans Fat: 0g
- Carbohydrates: 20g
- Fiber: 0g
- Protein: 1g
- Cholesterol: 15mg
Leave a Comment