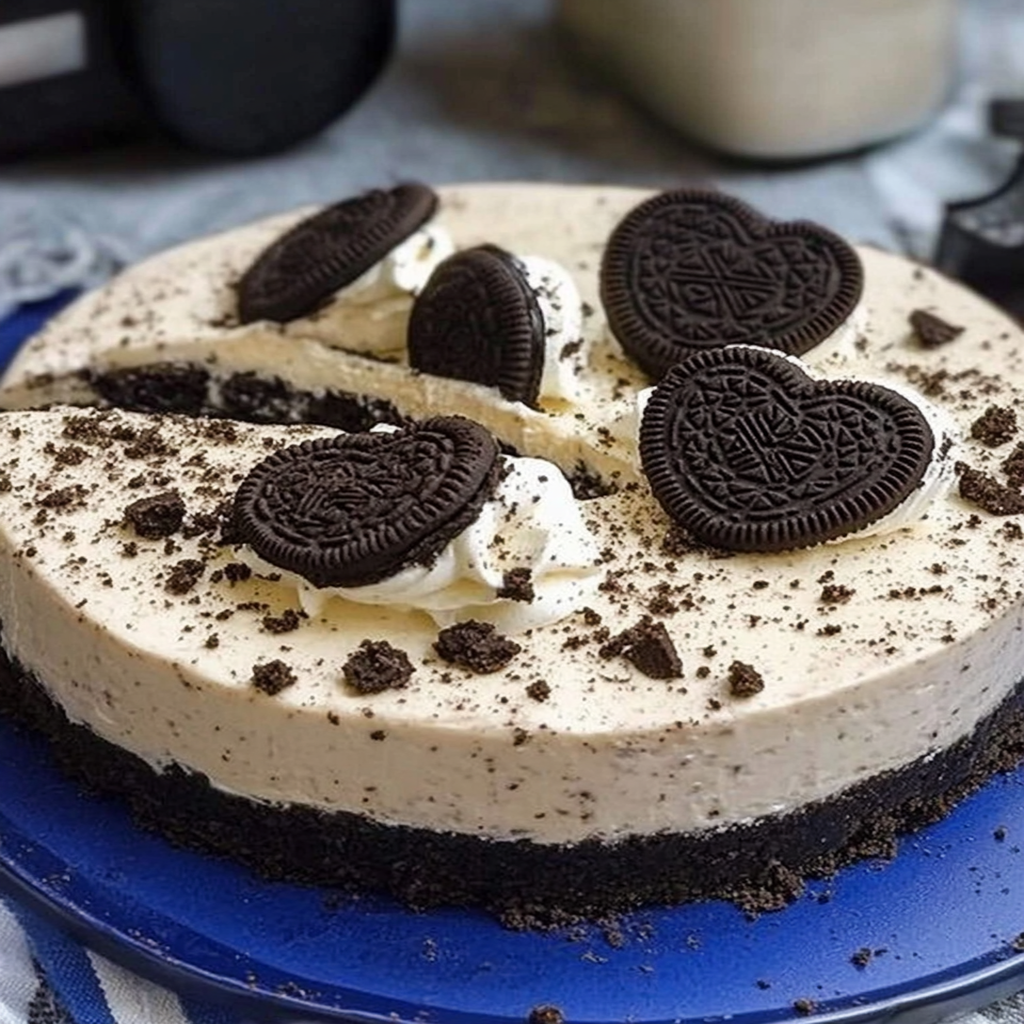
No-Bake Oreo Cheesecake Hearts are like a sweet hug for your taste buds, combining the rich, creamy texture of cheesecake with the delightful crunch of Oreos. Each bite feels like a celebration, perfect for any occasion where you want to impress without the stress of baking.
Imagine sinking your spoon into a heart-shaped dessert that melts in your mouth, all while you reminisce about those childhood days filled with cookies and cream. Whether it’s Valentine’s Day or just a Tuesday night craving, these delectable treats will have you swooning over their luscious flavors and charming presentation.
Why You'll Love This Recipe
- This No-Bake Oreo Cheesecake Hearts recipe is incredibly simple, requiring no baking and minimal cleanup.
- The rich chocolate cookie crust layered with velvety cheesecake creates an irresistible flavor combination.
- Their heart shape makes them visually appealing, perfect for special occasions or everyday indulgence.
- You can easily customize toppings to suit your mood or celebrate different holidays.
Ingredients for No-Bake Oreo Cheesecake Hearts
Here’s what you’ll need to make this delicious dish:
- Oreos: Use regular Oreos for the crust; their chocolatey crunch provides the perfect foundation for this dessert. decadent chocolate tarts.
- Butter: Melted butter helps bind the crushed Oreos together into a sturdy crust that holds its shape when chilled.
- Cream Cheese: Softened cream cheese creates that signature creamy texture; ensure it’s at room temperature for easy mixing.
- Powdered Sugar: Sweetens the cheesecake filling without adding any graininess, giving it that smooth finish we all crave.
- Vanilla Extract: A splash of pure vanilla extract enhances the flavor profile and adds depth to the cheesecake filling.
- Whipped Cream: Lightly whipped cream adds airiness to the filling, making each bite feel light yet indulgent.
How to Make No-Bake Oreo Cheesecake Hearts
Follow these simple steps to prepare this delicious dish:
Step 1: Make the Crust
Start by crushing about 20 Oreos into fine crumbs using a food processor or by placing them in a zip-top bag and smashing them with a rolling pin. Combine the crumbs with melted butter until well mixed.
Step 2: Form the Base
Press the Oreo mixture firmly into heart-shaped silicone molds or any other molds you have on hand. Aim for an even layer about half an inch thick. Pop these molds in the fridge while you prepare your filling.
Step 3: Prepare the Filling
In a mixing bowl, beat softened cream cheese until smooth using an electric mixer. Gradually add powdered sugar and continue mixing until incorporated. Add vanilla extract and mix well.
Step 4: Fold in Whipped Cream
Gently fold in whipped cream into your cream cheese mixture until blended but still fluffy—this will give your cheesecake its airy texture.
Step 5: Assemble Your Hearts
Remove your crust from the fridge and spoon your creamy filling over each crust evenly. Smooth it out with a spatula and then place it back in the fridge to set for at least two hours.
Step 6: Serve and Enjoy
Once set, gently remove your cheesecakes from their molds. Garnish with additional whipped cream or crushed Oreos on top if desired. Serve them chilled for a delightful treat!
Now that you’ve created these delightful No-Bake Oreo Cheesecake Hearts, sit back and enjoy every creamy bite! Perfect for sharing but honestly, who could blame you if you keep them all to yourself?
You Must Know
- This delightful No-Bake Oreo Cheesecake Hearts recipe is not just a treat for the taste buds; it’s a feast for the eyes.
- With minimal effort, you can create a stunning dessert that’s perfect for any occasion, from romantic dinners to birthday parties.
Perfecting the Cooking Process
Start by crushing the Oreo cookies into fine crumbs before mixing them with melted butter. Once you have your crust ready, whip up the cream cheese and sugar until smooth, then fold in whipped cream. Pour the mixture into your crust and chill it until set.
Add Your Touch
Feel free to swap out the Oreos for your favorite cookie or add a splash of vanilla extract to the filling. Want an extra layer of flavor? Drizzle some chocolate sauce or sprinkle crushed nuts on top before serving for that wow factor.
Storing & Reheating
Store any leftover No-Bake Oreo Cheesecake Hearts in an airtight container in the fridge for up to four days. If you need to reheat, serve it chilled as it tastes best cold, melting in your mouth like a creamy dream.
Chef's Helpful Tips
- For flawless No-Bake Oreo Cheesecake Hearts, always opt for room temperature cream cheese; it blends easier and prevents lumps.
- Use high-quality Oreos for richer flavor.
- Allow ample chilling time; patience is key to achieving that perfect slice.
It was my niece’s birthday party when I first made these No-Bake Oreo Cheesecake Hearts. Watching her and her friends devour them with glee reminded me how simple desserts can bring so much joy. caramel chocolate cheesecake cookies birthday cake Oreo cookies.
FAQs
What are No-Bake Oreo Cheesecake Hearts?
No-Bake Oreo Cheesecake Hearts are a delightful dessert that combines creamy cheesecake filling with crushed Oreo cookies, all shaped into heart molds. This recipe is perfect for special occasions like Valentine’s Day or anniversaries. Oreo raspberry cheesecake delight The best part is that you don’t need to bake anything, making it a quick and easy treat to whip up. With their rich flavor and charming appearance, these cheesecakes are sure to impress your loved ones.
How long do No-Bake Oreo Cheesecake Hearts need to set?
Typically, No-Bake Oreo Cheesecake Hearts require about four hours in the refrigerator to set properly. However, for best results, consider letting them chill overnight. This allows the flavors to meld beautifully and ensures a firmer texture. Make sure to cover them with plastic wrap or foil while chilling to prevent them from absorbing any odors from the fridge.
Can I customize the recipe for No-Bake Oreo Cheesecake Hearts?
Absolutely! You can easily customize your No-Bake Oreo Cheesecake Hearts by adding different flavor extracts like vanilla or almond. You can also layer in fruits like raspberries or strawberries for a refreshing twist. For an extra crunch, consider mixing in additional crushed Oreos or even sprinkles into the cheesecake mixture before pouring it into molds.
How should I store No-Bake Oreo Cheesecake Hearts?
Store your No-Bake Oreo Cheesecake Hearts in an airtight container in the refrigerator for up to five days. If you want to keep them longer, consider freezing them. Just make sure to wrap each heart individually in plastic wrap before placing them in a freezer-safe bag. They can be stored in the freezer for up to three months; just allow them to thaw in the fridge before serving.
Conclusion for No-Bake Oreo Cheesecake Hearts
No-Bake Oreo Cheesecake Hearts are a simple yet impressive dessert option that requires minimal effort and no baking time. With their rich and creamy filling combined with flavorful Oreos, they are perfect for any celebration or as a sweet treat after dinner. Customizing these hearts makes them versatile, allowing you to cater to different tastes. Remember to store them properly so you can savor their deliciousness for days! Enjoy making this delightful dessert that everyone will love!
No-Bake Oreo Cheesecake Hearts
No-Bake Oreo Cheesecake Hearts are a delightful treat that perfectly blend the rich, creamy essence of cheesecake with the iconic crunch of Oreos. Ideal for celebrations or as a sweet indulgence any day, these heart-shaped desserts require no baking, making them a hassle-free option for impressing guests. With a velvety filling and a sturdy cookie crust, each bite promises to be a memorable experience.
- Prep Time: 15 minutes
- Cook Time: None
- Total Time: 0 hours
- Yield: Serves 8 hearts 1x
- Category: Dessert
- Method: No-Bake
- Cuisine: American
Ingredients
- 20 Oreos (crushed)
- 4 tbsp unsalted butter (melted)
- 8 oz cream cheese (softened)
- 1 cup powdered sugar
- 1 tsp vanilla extract
- 1 cup whipped cream
Instructions
- Crush Oreos into fine crumbs and mix with melted butter. Press firmly into heart-shaped silicone molds to form the crust.
- Chill the crust while you prepare the filling.
- In a mixing bowl, beat softened cream cheese until smooth. Gradually add powdered sugar and vanilla extract, mixing until well combined.
- Gently fold in whipped cream until fully integrated and fluffy.
- Spoon the cheesecake filling over the chilled crusts and smooth evenly.
- Refrigerate for at least 2 hours or until set.
Nutrition
- Serving Size: 1 serving
- Calories: 250
- Sugar: 17g
- Sodium: 160mg
- Fat: 16g
- Saturated Fat: 8g
- Unsaturated Fat: 7g
- Trans Fat: 0g
- Carbohydrates: 25g
- Fiber: 1g
- Protein: 3g
- Cholesterol: 30mg
Leave a Comment