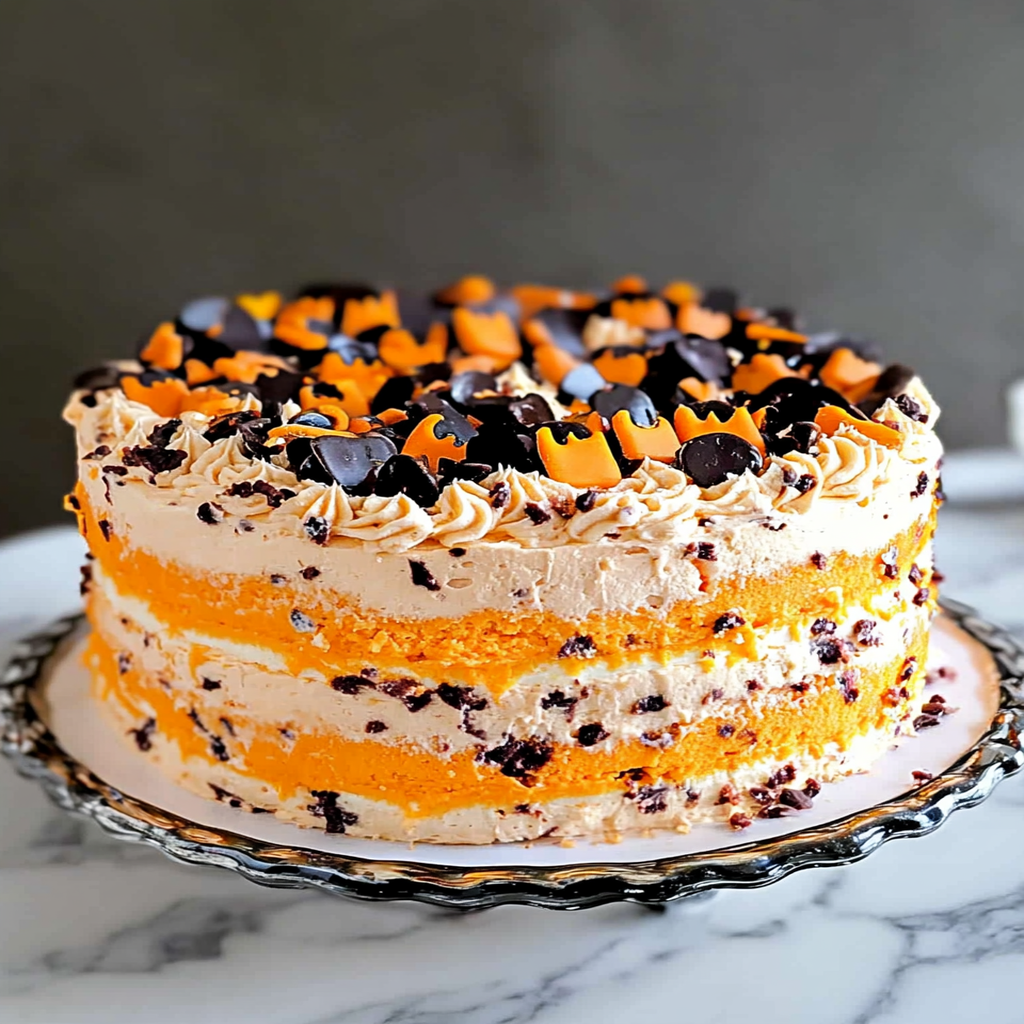
The mere mention of Halloween conjures visions of jack-o’-lanterns, creepy costumes, and an endless supply of candy. But this year, let’s add a tasty twist to your spooky celebrations with a Halloween Icebox Cake that will not only raise eyebrows but also tantalize taste buds. Picture layers of fluffy whipped cream, rich chocolate, and crunchy cookies blending together in a harmony of textures and flavors that will leave everyone guessing how you pulled off such a delicious treat
This dessert is perfect for gatherings where the scariest thing on the table should be the ghoulish decorations. It’s easy to make and even easier to devour—making it ideal for busy parents or last-minute party planners looking to impress without turning into a kitchen witch. Get ready for a delightful flavor experience that will haunt your guests in the best way possible!
Why You'll Love This Recipe
- This Halloween Icebox Cake is incredibly easy to prepare, so you can enjoy more time with friends and family.
- The combination of chocolate and cream creates an irresistible flavor profile that satisfies every sweet tooth.
- Visually appealing with its layered look, this cake is as fun to make as it is to eat.
- It’s versatile too—feel free to customize with your favorite cookies or seasonal flavors!
Ingredients for Halloween Icebox Cake
Here’s what you’ll need to make this delicious dish:
- Chocolate Sandwich Cookies: These serve as the base for your cake layers. Choose your favorite brand or go for something seasonal like pumpkin spice.
- Heavy Whipping Cream: Essential for creating that fluffy, creamy texture. Make sure it’s cold for optimal whipping.
- Powdered Sugar: This adds sweetness and helps stabilize the whipped cream. Use it sparingly; adjust based on your taste preference.
- Vanilla Extract: A splash enhances all the flavors beautifully. Go with pure vanilla extract if you want a richer taste.
- Cocoa Powder: Adds depth and richness to the whipped cream layers. Opt for unsweetened cocoa powder for best results.
How to Make Halloween Icebox Cake
Follow these simple steps to prepare this delicious dish:
Step 1: Prepare Your Ingredients
Gather all your ingredients and tools: a mixing bowl, a hand mixer or stand mixer, and a rectangular baking dish. This makes everything easier when you’re ready to whip up some spooktacular layers!
Step 2: Whip the Cream
In a large mixing bowl, pour in the heavy whipping cream along with powdered sugar and vanilla extract. Beat them together until soft peaks form—think clouds but tastier! This should take about 3-5 minutes using an electric mixer.
Step 3: Add Cocoa
Once your whipped cream has reached that heavenly fluffiness, gently fold in cocoa powder. Be careful here; we want lightness! Mix just until combined—the darker shades will create lovely contrast against the cookie layers.
Step 4: Layer It Up
Now comes the fun part! Start by placing a layer of chocolate sandwich cookies at the bottom of your baking dish. Spread some chocolate whipped cream over them like frosting on cake. Repeat these layers until you run out of cookies or cream—whichever comes first!
Step 5: Chill Out
Cover your masterpiece with plastic wrap and let it chill in the fridge for at least four hours—or overnight if you’re feeling patient (which is not likely when dessert awaits).
Step 6: Serve & Enjoy
When you’re ready to serve, cut into squares like you’re slicing through spooky fog! Top each slice with crumbled cookies or festive sprinkles if you want an extra touch of Halloween flair.
This Halloween Icebox Cake is sure to become an annual tradition—an enchanting blend of flavors that keeps everyone coming back for seconds (or thirds). As you whip up this treat year after year, may it become as much a part of your spooky celebrations as costumes and candy corn!
You Must Know
- This delightful Halloween Icebox Cake is not just a dessert; it’s a festive masterpiece that makes any gathering more fun.
- With layers of chocolate cookies, cream, and spooky decorations, it’s a crowd-pleaser that’s as easy to make as it is to devour.
Perfecting the Cooking Process
To achieve the best results with your Halloween Icebox Cake, start by preparing your whipped cream and layering it with chocolate cookies. Allow the cake to chill in the fridge while you set up your spooky decorations for that ultimate Halloween vibe.
Add Your Touch
Feel free to customize your Halloween Icebox Cake! Swap out chocolate cookies for ginger snaps or add some crushed candy corn between the layers for an extra festive touch. Get creative with toppings like gummy worms or edible glitter!
Storing & Reheating
Store your Halloween Icebox Cake in an airtight container in the fridge for up to three days. It’s best served cold, so no need to reheat—just slice and enjoy!
Chef's Helpful Tips
- When making your Halloween Icebox Cake, use full-fat cream cheese for a richer taste.
- Let the cake sit overnight for better flavor development.
- Don’t skip chilling time; it helps the layers meld deliciously!
Sharing this recipe reminds me of last Halloween when I surprised my friends with this cake. Their faces lit up when they saw it—who knew dessert could spark such joy?
FAQs:
What is a Halloween Icebox Cake?
A Halloween Icebox Cake is a no-bake dessert that combines layers of cookies and whipped cream, perfect for the spooky season. This cake typically features seasonal flavors like pumpkin spice or chocolate and can be decorated with festive toppings such as crushed candy corn or gummy worms. decadent chocolate tarts Its easy assembly and chilling time allow the flavors to meld beautifully, making it a delightful treat for Halloween parties.
How long does it take to make a Halloween Icebox Cake?
Preparing a Halloween Icebox Cake usually takes about 20 minutes of active time for assembling the ingredients. However, you need to chill it in the refrigerator for at least 4 hours, or ideally overnight. This chilling process is crucial as it allows the cookies to soften and absorb flavors from the cream, resulting in a deliciously creamy texture that everyone will love.
Can I make Halloween Icebox Cake ahead of time?
Yes, you can definitely make a Halloween Icebox Cake ahead of time! In fact, making it a day in advance enhances its flavors as they have more time to blend together. Just ensure you keep it covered in the refrigerator until you’re ready to serve. This dessert is ideal for parties, allowing you to enjoy your time with guests instead of spending hours in the kitchen on Halloween night.
What variations can I try for my Halloween Icebox Cake?
There are numerous variations you can explore when making your Halloween Icebox Cake. You might use different flavored cookies such as chocolate or ginger snaps instead of the traditional vanilla wafers. Additionally, you could incorporate seasonal ingredients like pumpkin puree or spices such as cinnamon and nutmeg for added flavor. Topping your cake with spooky decorations like edible glitter or themed sprinkles can also elevate its appearance!
Conclusion for Halloween Icebox Cake:
In summary, a Halloween Icebox Cake is an effortless yet impressive dessert perfect for any Halloween gathering. It requires minimal preparation and chilling time while delivering maximum flavor and festive appeal. Whether you stick to classic recipes or experiment with different flavors and decorations, this cake will surely delight your guests. Enjoy creating this spooky treat that captures the spirit of Halloween!
Halloween Icebox Cake
Indulge in a spooky yet scrumptious Halloween Icebox Cake that layers fluffy whipped cream, rich chocolate, and crunchy cookies for a delightful dessert that will impress your guests. Perfect for Halloween parties or family gatherings, this no-bake treat is easy to assemble and chill, leaving you with more time to enjoy the festivities. Customize it with your favorite flavors and toppings for a truly unique creation!
- Prep Time: 20 minutes
- Cook Time: None
- Total Time: 0 hours
- Yield: 12 servings 1x
- Category: Dessert
- Method: No-Bake
- Cuisine: American
Ingredients
- 2 cups heavy whipping cream (cold)
- 1/2 cup powdered sugar
- 1 tsp vanilla extract
- 1/4 cup unsweetened cocoa powder
- 24 chocolate sandwich cookies
Instructions
- In a mixing bowl, combine heavy whipping cream, powdered sugar, and vanilla extract. Whip until soft peaks form.
- Gently fold in cocoa powder until just combined.
- In a rectangular baking dish, layer chocolate sandwich cookies followed by a layer of chocolate whipped cream. Repeat until all ingredients are used.
- Cover with plastic wrap and refrigerate for at least 4 hours or overnight.
- Serve chilled, garnished with crushed cookies or festive toppings.
Nutrition
- Serving Size: 1 slice (100g)
- Calories: 250
- Sugar: 15g
- Sodium: 40mg
- Fat: 18g
- Saturated Fat: 10g
- Unsaturated Fat: 8g
- Trans Fat: 0g
- Carbohydrates: 22g
- Fiber: 1g
- Protein: 3g
- Cholesterol: 60mg
Leave a Comment