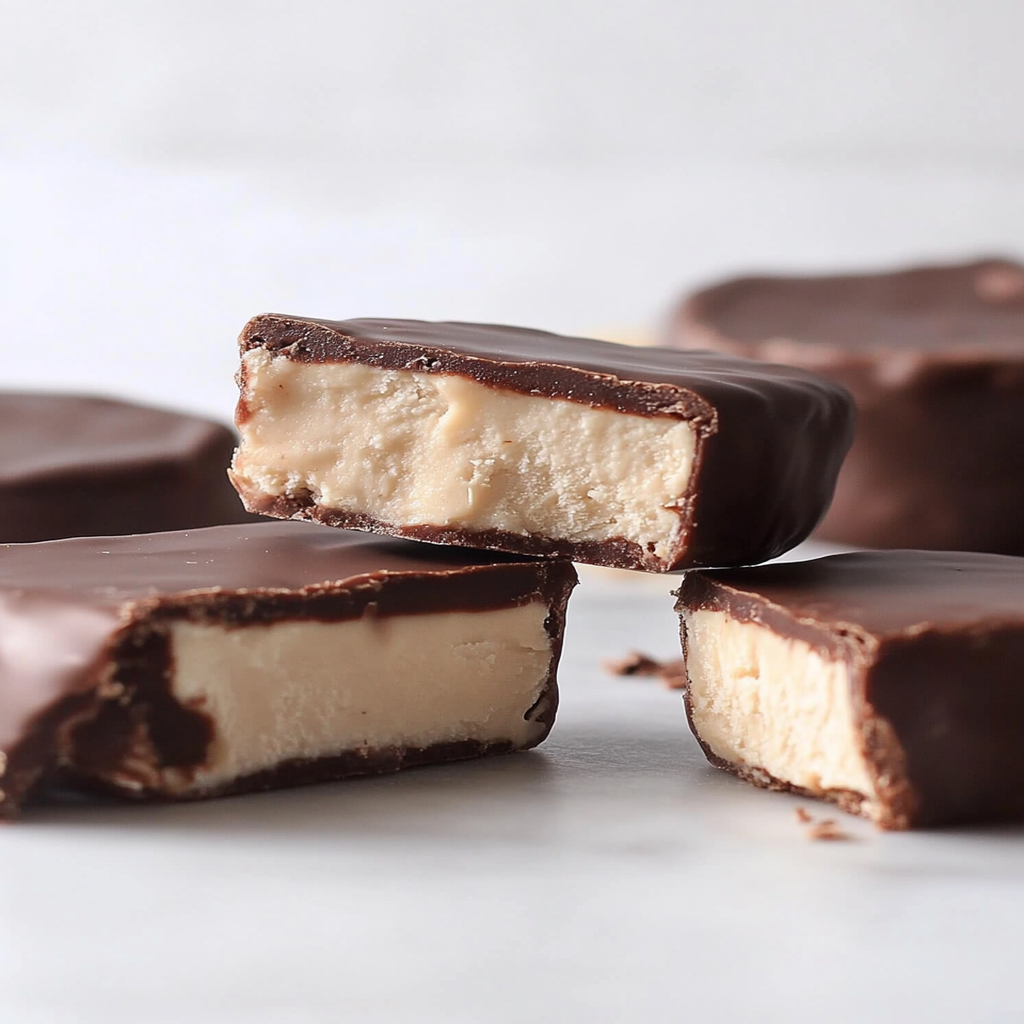
Dairy Free Klondike Bars are the sweet treat you didn’t know you needed until now! Imagine biting into a cold, creamy dessert that melts smoothly in your mouth while leaving behind a delightful chocolatey crunch. Dairy Free Ice Cream Bars Whether it’s a hot summer day or just a Tuesday afternoon, these bars are sure to satisfy your cravings and bring a smile to your face.
Now, let’s be real: who doesn’t love an ice cream bar? But what if I told you that you could indulge guilt-free with these Dairy Free Klondike Bars? Picture this: You’re lounging on the couch after a long day, and instead of feeling guilty about indulging in sweets, you can enjoy every bite without worrying about dairy. Sounds perfect, right?
Why You'll Love This Recipe
- These Dairy Free Klondike Bars are incredibly easy to make, ensuring you spend minimal time in the kitchen.
- Their rich chocolate coating paired with creamy coconut filling delivers a flavor explosion.
- Visually appealing with their glossy chocolate surface, they will impress anyone who sees them.
- Enjoy them as an after-dinner treat or a midday snack—these bars are versatile for any occasion!
Ingredients for Dairy Free Klondike Bars
Here’s what you’ll need to make this delicious dish:
- Coconut Milk: Use full-fat coconut milk for a creamy texture that mimics traditional ice cream.
- Maple Syrup: This natural sweetener adds just the right amount of sweetness to balance the flavors.
- Cocoa Powder: Unsweetened cocoa powder gives the chocolate coating its rich flavor; opt for high-quality brands for best results.
- Dairy Free Chocolate Chips: These will melt beautifully for the coating—look for brands without milk ingredients.
- Vanilla Extract: A splash of vanilla enhances all the flavors and brings everything together.
How to Make Dairy Free Klondike Bars
Follow these simple steps to prepare this delicious dish:
Step 1: Prepare the Coconut Mixture
In a mixing bowl, whisk together coconut milk, maple syrup, and vanilla extract until well combined. This creamy mixture will serve as the base of your ice cream bars.
Step 2: Freeze the Mixture
Pour your coconut mixture into an ice cube tray or silicone molds. Cover with plastic wrap and freeze for at least four hours or until solid. Patience is key here—good things come to those who wait!
Step 3: Melt the Chocolate
While your coconut mixture freezes, melt the dairy free chocolate chips in a microwave-safe bowl. Heat them in short bursts of about 30 seconds and stir in between until smooth.
Step 4: Coat the Frozen Bars
Once your coconut bars are frozen solid, gently remove them from the molds. Dip each bar into the melted chocolate quickly; let any excess drip off before placing them on parchment paper.
Step 5: Refreeze the Coated Bars
Return your coated bars to the freezer for at least another hour so they can firm up again. The chocolate coating should be hard but not too thick; after all, we want to maintain that divine crunch!
Step 6: Serve and Enjoy!
Once they’re set, serve your Dairy Free Klondike Bars straight from the freezer. They’re perfect as an after-dinner treat or whenever you need a sweet pick-me-up!
Transfer to plates and drizzle with extra melted chocolate if you’re feeling extra indulgent! Double Chocolate Cookie Granola.
And there you have it—your own homemade Dairy Free Klondike Bars! Who would’ve thought something so delicious could be made right in your kitchen? Now go ahead and treat yourself; you’ve earned it!
You Must Know
- These Dairy Free Klondike Bars are not just a treat; they’re a frozen delight that’s simple to whip up.
- You can personalize the flavors and enjoy a guilt-free indulgence.
- The creamy texture and chocolate coating make them irresistible on any hot day!
Perfecting the Cooking Process
First, prepare your base by blending coconut milk with sweetener and flavorings. Freeze this mixture in molds. While it’s setting, melt your dairy-free chocolate and coconut oil for the coating. Once the bars are frozen, dip them in the chocolate mixture for that perfect finish.
Add Your Touch
Feel free to get creative! Add vanilla extract or a pinch of sea salt to the base for extra flavor. You can also mix in crushed nuts or fruits like berries before freezing to enhance the texture and taste of your Dairy Free Klondike Bars.
Storing & Reheating
Store your Dairy Free Klondike Bars in an airtight container in the freezer. They will maintain their quality for up to two weeks. For best results, avoid leaving them out at room temperature for too long; nobody likes a melty mess!
Chef's Helpful Tips
- Use full-fat coconut milk for a creamier texture that closely mimics traditional ice cream.
- Freeze your bars overnight for optimal firmness before dipping in chocolate.
- When melting chocolate, do it slowly to avoid burning—nobody wants scorched chocolate ruining their dessert!
It was a scorching summer day when I first made these Dairy Free Klondike Bars, and my friends devoured them within minutes. Strawberry Shortcake Treats Their smiles said it all, and I knew I had created something special!
FAQs :
What are Dairy Free Klondike Bars made of?
Dairy Free Klondike Bars are typically made using non-dairy alternatives to traditional ingredients. The base often includes coconut milk or almond milk combined with sweeteners and flavorings. For the chocolate coating, dairy-free dark chocolate or carob chips can be used, allowing you to enjoy a delicious treat without dairy. Samoa Caramel Ice Cream This recipe caters to those who are lactose intolerant or following a vegan lifestyle while still delivering that classic ice cream bar experience.
How can I store Dairy Free Klondike Bars?
To store your Dairy Free Klondike Bars, wrap them individually in parchment paper or place them in an airtight container. Proper storage helps maintain their texture and flavor. Keep them in the freezer for optimal freshness. They can last up to two weeks when stored correctly. If you notice any freezer burn or changes in texture, it’s best to consume them sooner rather than later to enjoy their full taste.
Can I customize the flavors of Dairy Free Klondike Bars?
Absolutely! One of the best aspects of making Dairy Free Klondike Bars at home is the ability to customize flavors. You can add ingredients like vanilla extract, cocoa powder, or even fruit purees to create unique variations. Experimenting with different types of non-dairy milk can also yield different textures and tastes, so feel free to mix and match until you find your favorite combination.
Are Dairy Free Klondike Bars healthy?
Dairy Free Klondike Bars can be a healthier alternative to traditional ice cream bars, especially when made with natural sweeteners and wholesome ingredients. By using non-dairy milks and avoiding added preservatives found in store-bought options, you can create a treat that fits better into a balanced diet. However, moderation is key since they still contain sugars and fats. Always check ingredient quality for the healthiest version.
Conclusion for Dairy Free Klondike Bars :
In conclusion, making Dairy Free Klondike Bars at home is an enjoyable way to indulge in a classic treat while accommodating dietary restrictions. Utilizing non-dairy ingredients allows everyone to savor this delicious dessert without compromising flavor or texture. With simple storage tips and endless customization options, you’ll have a delightful dessert ready whenever you crave something sweet. Enjoy crafting your own version today!
Dairy Free Klondike Bars
Dairy Free Klondike Bars are the perfect frozen treat for satisfying your sweet tooth without guilt! These delightful bars feature a rich and creamy coconut filling, encased in a luscious dairy-free chocolate coating. Easy to make and fully customizable, they’re ideal for summer days or as a quick snack anytime. Treat yourself to this delicious dessert that everyone will love!
- Prep Time: 15 minutes
- Cook Time: 0 minutes
- Total Time: 15 minutes
- Yield: Makes about 6 servings 1x
- Category: Dessert
- Method: Freezing
- Cuisine: Vegan
Ingredients
- 1 cup full-fat coconut milk
- 1/4 cup maple syrup
- 1 tsp vanilla extract
- 1/2 cup dairy-free chocolate chips
- 2 tbsp cocoa powder
Instructions
- In a mixing bowl, whisk together coconut milk, maple syrup, and vanilla extract until smooth.
- Pour the mixture into ice cube trays or silicone molds and freeze for at least 4 hours or until solid.
- Melt dairy-free chocolate chips in a microwave-safe bowl in short bursts until smooth.
- Remove frozen bars from molds and quickly dip each bar in the melted chocolate, allowing excess to drip off.
- Place coated bars on parchment paper and return to the freezer for at least 1 hour to set.
- Serve directly from the freezer and enjoy!
Nutrition
- Serving Size: 1 bar (70g)
- Calories: 150
- Sugar: 10g
- Sodium: 5mg
- Fat: 10g
- Saturated Fat: 8g
- Unsaturated Fat: 2g
- Trans Fat: 0g
- Carbohydrates: 15g
- Fiber: 2g
- Protein: 2g
- Cholesterol: 0mg
Leave a Comment